本文描述了如何通过单机三个msyql实例,创建一个Single-Primary Innodb cluster,并通过mysql Router对connections实现路由,实现高可用性。
| ip地址 | 主机名 | server_id |
|---|---|---|
| 192.168.0.101 | mysql001 | 1 |
| 192.168.0.102 | mysql002 | 2 |
| 192.168.0.103 | mysql003 | 3 |
| 192.168.0.104 | mysql-router |
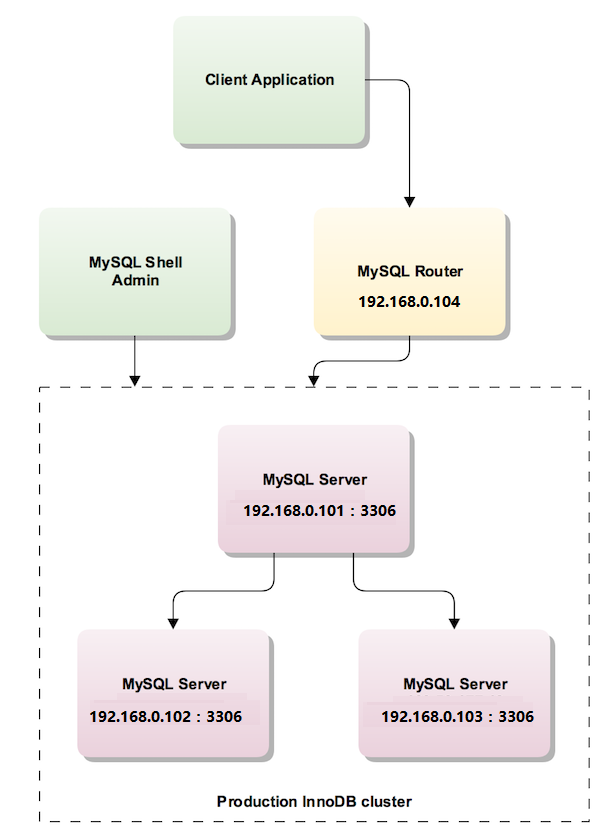
主要步骤如图所示
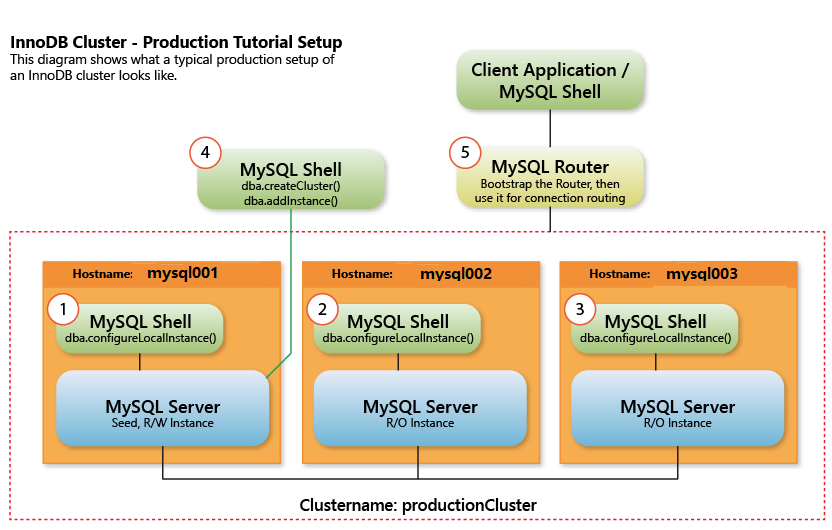
1. 安装3个mysql实例
注意:修改root密码时候设置SQL_LOG_BIN=0;此步骤主要是避免Executed_Gtid_Set不一致
|
|
一句话执行
|
|
2. Yum 安装MySQL Shell
|
|
3. Configuring the Instance
检查并配置3个数据库实例
|
|
详细过程如下所示
|
|
重启3个数据库实例
|
|
重新检查3个实例,确保结果ok
|
|
4. 创建 InnoDB Cluster
Connect MySQL Shell to the seed instance, in this case the one at port 3306:
|
|
Use the createCluster() method to create the InnoDB cluster with the currently connected instance as the seed:
|
|
5.添加 Instances 至 InnoDB Cluster
配置/etc/hosts
|
|
Obtaining the cluster Instance Variable
|
|
Add the second instance to the InnoDB cluster:
|
|
Add the third instance:
|
|
查看cluster 状态
|
|
6. 持久化配置文件
已经在cluster中的实例,第二次运行dba.configureLocalInstance(‘root@localhost:3306’),会将配置cluster的配置持久化到my.cnf
必须使用localhost连接后在每个实例单独执行
|
|
7. 安装配置 MySQL Router
Yum安装
|
|
bootstrap 生成配置文件
|
|
配置文件/etc/mysqlrouter/mysqlrouter.conf内容
|
|
启动mysqlrouter(记得修改下权限 默认权限不对)
|
|
测试连接
|
|
8. Testing Failover
killing the PRIMARY instance 192.168.0.101:3306
|
|
测试连接(第一次失败,第二次成功)
|
|
查看cluster状态, 可以发现192.168.0.102:3306已经变成Primary
|
|
bring the instance that you killed back online.
|
|
重新查看cluster状态
|
|